
E37 Error
The E37 error means your heat pump has detected poor water flow.
Main Causes
- Low water pressure Your heating system needs to be filled to 1.7 bar. → See this guide: How to top up your heating system using a filling loop.
- System has a leak
- Ensure that there are no leaks on the system.
- Zones or radiators shutting down
- Thermostats or zone valves closing off underfloor heating (UFH) or radiator circuits.
- Very common if all UFH zones are closed.
Quick fix to test: Remove one zone actuator from your main zone so that circuit stays open. This often clears the error immediately.
Your Fjord I cylinder has two operating modes:
- Heating mode
- Heating + Fan mode
Heating + Fan mode keeps the fan running constantly for extra air circulation. The fan symbol will appear on the display if this is activated.
To change which mode you are in, either change it in the APP or by pressing and holding the immersion button (second button from the left) for 5~6 seconds. If this function is enabled the fan will continue working to ventilate the air, when the water temperature reaches the set point and unit is standby.
Important: This mode is only practical if your external exhaust is ducted internally in the property. Otherwise, use normal Heating mode.
Get your heat pump connected for app control in under a minute.
Quick steps:
- Press and hold the power button for 3 seconds to unlock the display.
- Press and hold the power button + up button together for 5 seconds.
- The Wi-Fi symbol will flash when it’s ready to connect.
- Move onto your phone now and follow our guide on connecting to your phone. (246) How to Connect Your Phone to the Adlar Castra Heat Pump - YouTube
Watch the full video: https://www.youtube.com/watch?v=lBGf72MT5ek
You can control your heat pump from your phone using the Smart Life app.
Step-by-step:
1. Activate WiFi on the heat pump
- Press any button to wake the screen.
- Press and hold the Power button + Up arrow together for 5 seconds.
- You’ll hear a beep and the WiFi symbol will start flashing.
2. Add the device in the Smart Life app
- Open the Smart Life app and sign in.
- Tap the + button to add a device.
- Go to Large Home Appliances → select Heat Pump (WiFi).
- Enter your home WiFi password.
- Wait for the app to connect.
Once connected, you can adjust temperature, change modes, and monitor your system remotely.
Watch the full video on our YouTube channel. (246) How to Connect Your Phone to the Adlar Castra Heat Pump - YouTube
See our guide on getting the heat pump into pairing mode: How to Activate WiFi on Your Adlar Castra UK Heat Pump
You can easily change the heating temperature directly on the heat pump control panel.
How to Adjust Temperature Settings on Your Adlår Castra Heat Pump
Step-by-step:
1. Unlock the display Press and hold the Power button for 3 seconds until you hear a beep (the padlock disappears).
2. Adjust in manual mode Use the Up and Down arrow buttons to set your desired temperature.
3. Use Heat Curve mode (recommended for efficiency)
- Let the screen flash after unlocking.
- Press and hold the M button.
- Choose your curve: HH1 (warmest) to HL8 (lowest).
- Press the Power button to save.
Tip: Heat Curve mode is usually more efficient than a fixed manual temperature.
You can easily change the heating temperature directly on the heat pump control panel.
How to Control Your Adlar Castra Heat Pump from Your Phone
Step-by-step:
1. Unlock the display Press and hold the Power button for 3 seconds until you hear a beep (the padlock disappears).
2. Adjust in manual mode Use the Up and Down arrow buttons to set your desired temperature.
3. Use Heat Curve mode (recommended for efficiency)
- Let the screen flash after unlocking.
- Press and hold the M button.
- Choose your curve: HH1 (warmest) to HL8 (lowest).
- Press the Power button to save.
Tip: Heat Curve mode is usually more efficient than a fixed manual temperature.
If your underfloor heating (UFH) zones stay cold, follow these checks in order:
Quick checks
- Room thermostats Set the thermostat 2–3°C higher than the current room temperature so the zone calls for heat.
- Zone actuators Check the actuators on the manifold are opening (you should hear them click). Remove one actuator to manually open the zone for testing.
- Flow meters Make sure all flow meters on the UFH manifold are fully open. → See: How to adjust flow rates on your Underfloor Heating System
- Circulation pump Confirm the pump is running (listen for it or check Live Data on the heat pump).
- Mixer valve Check the UFH mixer valve is set correctly (set to maximum / 50°C).
Extra checks
- System pressure must be around 1.7 bar.
- Bleed any air from the system.
- Make sure the heat pump is running and producing warm water (check flow temperature in Live Data).
Tip: Low flow is a very common cause — see our E37 Error guide if you get that error.
If your home isn’t getting warm enough, follow these simple steps:
1. Check the Sun Symbol Make sure the ☀️ sun symbol is showing in the top left of the display (this means heating mode is active). Tap the M button until the sun appears.
2. Turn the Heat Pump ON
- Press and hold the Power/Lock button for 5 seconds to unlock the display.
- Press the Power button again for 2–3 seconds. The sun symbol should appear and heating will start.
3. Increase the Heat Curve
- Unlock the display.
- Briefly press the Down arrow to enter heat curve mode.
- Press Down to raise the curve (higher number = more heat output).
Important note It can take 24–36 hours for your home to fully warm up after changing the heat curve.
During normal operation your Adlår Castra heat pump display should look like this:
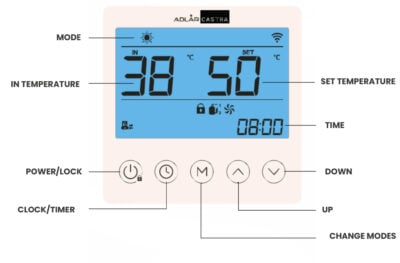
Main numbers
- IN – Return water temperature coming back from your home (example: 38°C)
- SET – Target water temperature (example: 50°C)
Symbols you should see
- ☀️ Sun symbol (top left) – Heating mode is active (this is what you want in winter)
- 📶 WiFi symbol – Connected to your home WiFi
- 🔒 Lock symbol – Display is locked (normal). Hold the Power button for 3–4 seconds to unlock.
- Pump symbol (bottom left) – Circulation pump is running
- Fan + Compressor symbols – The heat pump is working and heating your home
- TIME (bottom right) – Current clock time (example: 08:00)
Tip: If you see the sun, pump, fan and compressor symbols together, your system is operating normally.
How to Set Timers on Your Fjord I Cylinder
Your Fjord I cylinder has a built-in timer for automatic heating.
To set the Clock (current time):
- Short press the ⏰ Clock/Timer button.
- Use ▲ and ▼ arrows to set the hour and minute.
- Press ⏰ to save and exit.
To set the Timer (ON / OFF):
- Press and hold the ⏰ Clock/Timer button for 5 seconds.
- Set the Timer ON time:
- Use ▲ and ▼ to set the hour.
- Press ⏰ to move to minutes and set them.
- Press ⏰ again to set the Timer OFF time (repeat the steps).
- Press ⏰ once more to save and exit.
To cancel the timer while programming: While setting Timer ON or Timer OFF, press the Settings (gear) button to cancel.
Notes:
- The timer repeats every day.
- Settings are saved even after a power cut.
Alternative option: Create more flexible schedules using Smart Scenes in the Smart Life app.
How to Create Smart Scenes in the Adlår Castra App (Heating & Hot Water)
Smart Scenes let you automatically control your heat pump and Fjord I cylinder based on time, weather, or other triggers.
(246) How to Create Smart Scenes in the Adlår Castra App (Heating & Hot Water) - YouTube
Step-by-step:
- Open the Smart Life app and tap Scene (or Smart) at the bottom.
- Tap the + icon to create a new scene.
- Choose a trigger (e.g. specific time, sunrise/sunset, or temperature).
- Add an action:
- Select your Adlår Castra heat pump or Fjord I cylinder.
- Turn it On/Off, set temperature, choose Heating or Hot Water mode, or activate immersion boost.
- Name your scene (e.g. “Morning Heat” or “Evening Hot Water”) and tap Save.
Note: Scenes may struggle
Smart Thermostats
You can add smart room temperature sensors to the Smart Life app for automatic, efficient control of your Adlår heat pump.
This is an Example device you can purchase, and add it to your Smart Life app. There are a number of alternatives also available.
How to use it:
- Pair the sensor in the Smart Life app.
- Create a Smart Scene that changes the heat curve based on the actual room temperature.
Example scene:
- If room temperature > 21°C → set a lower heat curve (e.g. HL1)
- If room temperature < 21°C → set a higher heat curve (e.g. your normal HH8)
Efficiency tip: Use the thermostat to adjust heat curves rather than turning the heat pump fully on or off. This reduces short cycling and improves efficiency
You can easily share control of your Adlår heat pump and cylinder with family members (or allow Adlår support to check your system remotely).
Step-by-step:
- Open the Smart Life app and tap Me (bottom right).
- Tap Home Management.
- Select your home.
- Tap Add Member.
- Choose Administrator or Common Member, then:
- Enter their name + email/phone, or
- Copy the invitation code/link and send it via message.
- Your family member opens the app → Me → Home Management → Join a Home.
- They enter the code/link and accept.
Adlår Support You can add our team the same way so we can remotely monitor and help troubleshoot your system.
Tip: The new member must already have a Smart Life account.
If your Adlår Castra heat pump won’t connect to WiFi, try these common fixes:
1. Move your router closer Poor signal is the most frequent cause.
- Temporarily place your WiFi router nearer to the heat pump.
- Use a wired Ethernet extension cable if needed (no need to move the router permanently).
- Once connected, you can move the router back to its normal position.
2. Use 2.4 GHz WiFi only The heat pump only works on 2.4 GHz networks.
- Log into your router settings and temporarily disable the 5 GHz band.
- After the heat pump connects successfully, you can turn 5 GHz back on.
See also: How to Activate WiFi on Your Heat Pump | How to Connect Your Phone to the Heat Pump
Ready to paste straight into Elementor. Want any tweaks?
Can't See Automations / Smart Scenes in the App
If your automations (Smart Scenes) are not visible in the Smart Life app, you’re probably in the wrong view.
Quick fix:
- On the home screen, tap Smart at the bottom.
- At the top of the screen, look at the bar. If Tap to Run is highlighted in bold, tap Automation instead.
- Your automations and Smart Scenes will now appear.
Tip: “Tap to Run” is for one-off actions. “Automation” is where all your scheduled and automatic scenes live.
See also: How to Create Smart Scenes in the Adlår Castra App
Follow these steps to program the automatic hot water timer on your cylinder:
To set the timer:
- Press the Power button to wake the display.
- Press and hold the ⏰ Clock button for 5–6 seconds until “ON” appears.
- Use the ▲ and ▼ arrows to set your ON time.
- Press the ⏰ Clock button to confirm and move to minutes, then set the minutes.
- Press the ⏰ Clock button again – it will switch to “OFF”. Set your OFF time the same way.
- Press the ⏰ Clock button once more to save. Both ON and OFF times will now be displayed on the screen.
To cancel the timer: Press and hold the ⏰ Clock button (so ON or OFF is selected), then press the Settings (Gear) icon. The timer settings will disappear.
Tip: For easier and more flexible scheduling, use Smart Scenes in the Smart Life app instead.
See also: How to Set Timers on Your Fjord I Cylinder | How to Create Smart Scenes
The E51 error (and often E37) usually means no water flow through the heat pump. This is very common on systems with full zonal control (thermostats or actuators closing off zones).
Quick fixes
- Set your room thermostats to the highest setting so they are calling for heat.
- Lower the heat pump’s target temperature to the lowest setting HL7-8.
These keep the zone valves open and prevent the heat pump from shutting down the flow.
Test: Set all thermostats to maximum. If the error disappears, this is the cause.
Long-term solutions
- Manually open one actuator fully on your largest zone (this ensures constant flow).
- Add a Smart Life compatible room thermostat in the main zone.
- Create Smart Scenes in the app:
- Turn the heat pump OFF when room temperature reaches 1°C below your thermostat setting.
- Turn the heat pump back ON when the room temperature drops again.
This stops the zone valves from closing before the heat pump shuts down.
Unlike many single-mode heat pumps, your Adlår dual heat pump system can provide cooling without any extra parts or upgrades.
Important Condensation Warning:
When the heat pump cools the water, pipes can become cold. Condensation (and dripping water) usually starts on exposed copper pipes when the water temperature is 4–8°C below room air temperature. This risk exists even with underfloor heating if pipes are not fully lagged/insulated and can lead to damp, mould or damage.
Recommended & Safest Method (Most Homes):
Keep the heat pump in Heating mode at all times. On warm days simply set the lowest heat curve (HL8). Even if the set temperature is below ambient air temperature, the heat pump will not provide active cooling — it only circulates water. You may feel a small passive benefit, but it is very limited.
Full Cooling Mode:
You can switch the heat pump into dedicated Cooling mode (CL1–CL8 or CH1–CH8 curves). If you choose to do this:
- Set the water temperature manually with only a small difference (max 4–5°C) from the current room temperature.
- Monitor the system closely.
Liability Note Adlår is not responsible for any condensation, damp or related damage while the system is in cooling mode. As a precaution we strongly advise against using full cooling mode unless you are able to monitor it carefully at all times.
Best practice Stick with HL8 in Heating mode for safe, low-risk summer cooling. You can automate this with a Smart Scene if you wish.
Requires Smart Life compatible thermostat. Here is an example.
This setup gives you a reliable baseline day/night schedule plus an automatic “cold boost” if the house gets too cold during the day, while night setback always takes priority.
You will create 4 scenes/automations:
1. Aurora Daytime (Scene – schedule-based)
- Runs at your chosen daytime start time (e.g. 06:00)
- Sets your normal comfort heat curve
2. Aurora Nighttime (Scene – schedule-based)
- Runs at your chosen nighttime start time (e.g. 22:30)
- Sets setback / reduced heat curve
- Also disables the two automations below (Cold Boost + Return Normal)
3. Aurora Cold Boost (Automation)
- If: Room temperature drops below 18°C AND it is during daytime hours only
- Then: Set a higher heat curve (or higher target temperature)
4. Aurora Return Normal (Automation)
- If: Room temperature rises above 16.5–17°C AND it is during daytime hours only
- Then: Restore your normal daytime heat curve
Tip Using 16.5–17°C (instead of exactly 16°C) in the Return Normal automation prevents annoying on/off ping-ponging.
Final result
- Daytime: normal comfort + automatic boost if needed
- Nighttime: setback mode always wins (boost automations are disabled)
See also: How to Create Smart Scenes in the Adlår Castra App | Smart Thermostats
Any device on the Smart Life infrastructure can be added to the APP and used to control your heat pump/system.
A good additional product is a smart life thermostat. Here is one example.
Yes – it is perfectly safe and recommended to leave your Adlår Castra heat pump turned on all year round.
What happens in summer:
When the outside air temperature is higher than your set heat curve, the compressor stays completely off. Only the circulation pump runs occasionally to keep the system ready. This uses very little electricity.
Best practice for summer
- Keep the heat pump in Heating mode.
- Set the lowest heat curve (HL8).
This gives you gentle passive cooling through your underfloor heating or radiators while using almost no energy.
For example, when your flow temperature is lower than the ambient air temperature the heat pump won't operate at all.
See also: Cooling with Your Adlår Castra Heat Pump Heat Curves Explained
Air Conditioning with the Fjord I Cylinder
The Fjord I is not just a hot water cylinder — it also has its own built-in air source heat pump. One of the useful byproducts of this design is cold air, which can be used to help cool your home during warmer months.
How It Works
When the Fjord I runs to heat your hot water, the heat pump unit expels cold air (typically around 10°C cooler than the air it takes in).
Instead of always exhausting this cold air outside, you can redirect it into your home through ducting. This gives you a form of free or low-cost passive cooling during spring, summer, and early autumn.
Key Benefits
- Uses the cold air that is already being produced while heating hot water.
- Can provide gentle cooling without needing a separate air conditioning system.
- Very low running cost (the system is already running to produce hot water).
- Helps reduce overheating in well-insulated or south-facing homes.
How to Use It
The Fjord I cylinder has a manual ducting arrangement at the top. You can switch the ducting between:
- Exhausting cold air outside (normal operation)
- Ducting cold air inside the property (cooling mode)
This is usually done by adjusting the ducting connections or using a manual damper. Many customers set it to blow cold air into hallways or living areas during the day.
Important Things to Know
- This is passive/gentle cooling, not powerful air conditioning. It works best in spring and summer, and less effectively during very hot spells.
- You should only duct the cold air inside when you actually need cooling. Leaving it running unnecessarily can over-cool parts of the house.
- Make sure any ducting used inside the home is properly insulated to avoid condensation.
Best Practice
Many customers use the Fjord I for cooling in the following way:
- Run the cylinder on a timer during the warmer part of the day.
- Duct the cold air into the house while it’s running.
- Switch back to exhausting outside when cooling is no longer needed.
The P07 error on your Fjord I cylinder usually means the cylinder is not filling with water properly. This is quite rare and is most often caused by a temporary disruption to your incoming mains water at the same time hot water is being used. It can also be triggered by the automatic Legionella cycle.
Quick fixes (try in order):
- Turn the cylinder off using the power button on the display, wait 30 seconds, then turn it back on. Check if the error clears.
- Turn the cylinder off at the mains isolator, wait 2 minutes, then turn it back on. After that, make sure you also turn the heat pump ON on the main display.
- In the Smart Life app, tap on the error message to clear it.
If the error keeps returning:
- Weekly occurrences → This is often linked to the Legionella cycle. Contact the office for a settings adjustment.
- Frequent / daily occurrences → Check that your incoming mains stop cock is fully open (a partially closed valve can restrict water flow to the tank).
- If the error continues after the above steps, please contact the Adlår office on 01252 268 669.
See also: How to Set Hot Water Timer on Your Fjord I Cylinder Smart Thermostats & Smart Scenes
Please read first: Cooling with Your Adlår Castra Heat Pump
Adlår sets a minimum cooling temperature of 15°C (parameter P113) as a safety limit. This prevents condensation on pipes if they are not fully lagged or if the system is used without careful monitoring.
If you are confident your pipework is properly insulated and you want stronger cooling:
- Watch our video guide: Adlår Castra Control Box: Parameter Settings Guide (For Advised Users)
- Unlock the heat pump display.
- Change parameter P113 (Minimum temperature for cooling) to a lower value (e.g. 10°C or below).
- Default: 15°C
- You can also check P112 (Maximum temperature for cooling) which is normally 22°C.
⚠️ Strong Warning We do not recommend lowering this setting unless you have fully inspected your pipework and are prepared to monitor for condensation. Adlår cannot be held responsible for any damp, mould or damage caused by condensation in cooling mode.
Alternative solution Fan-assisted radiators (or fan convectors) are much better at handling lower water temperatures and greatly reduce condensation risk.
Why the system may cycle on/off quickly The 15°C safety limit means the heat pump reaches its target very quickly in hot weather and then stays off for long periods. Lowering P113 (with caution) allows it to run longer for more noticeable cooling.
See also: Cooling with Your Adlår Castra Heat Pump
Your Adlår Castra heat pump uses a weather compensation heating curve. This automatically adjusts the water temperature sent to your radiators or underfloor heating based on the outside air temperature — the warmer the water, the warmer your home.
Recommended starting curves
- Good insulation + underfloor heating → HL8 to HL4 (low-temperature curves)
- Radiators with fans → HL4-HL1
- Old radiators without fans → HH8-HH4 or a high-temperature curve (HH4 to HH1)
Your installer will have set an initial curve based on your home during commissioning.
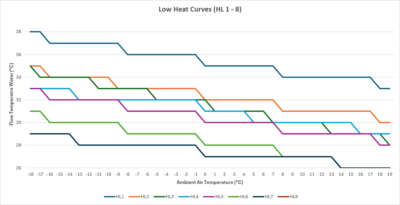
Below are the two detailed graphs showing all available curves:
High Temperature Curves (HH1 – HH8)
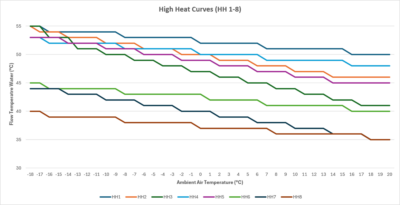
Low Temperature Curves (HL1 – HL8)
How to adjust your heat curve
- House still too cold? → Raise the curve one step (e.g. HL6 → HL5 or HL4)
- House too warm? → Lower the curve one step (e.g. HL6 → HL7 or HL8)
Important The heat pump is a slow-responding system. Always wait at least 4 hours (ideally 24 hours) after changing the curve before deciding whether to adjust it again.
See also: Heat Curves Explained How to Adjust Temperature Settings
Your Adlår Castra system may include secondary circulation pumps (for upstairs, downstairs, or different zones). These can be controlled in two ways:
- Directly by the heat pump, or
- By your existing thermostat/zone control system (e.g. Heatmiser, Hive, etc.)
What we normally do
If you already have a working zone control system (such as Heatmiser), we usually leave it in place. Your existing thermostats will continue to open and close zones and turn the secondary pumps on and off as before.
How to optimise your system
- Set all room thermostats to maximum (or at least 2–3°C above current room temperature). This opens every zone valve and calls for heat, keeping the secondary pumps running continuously.
- Now fine-tune your heat curve (see our Heat Curves guide). Find the lowest curve that still gives you comfortable warmth throughout the house.
- Once you’re happy with the heat curve, you can (if you wish) start closing some zones again.
Efficiency tip The most efficient way to run the system is to keep all (or most) zones open and let the heat pump work at the lowest possible temperature. Frequent opening and closing of zones usually means the heat pump is running too hot and less efficiently.
Best practice if you still want to close zones Always keep at least one main zone or a larger/colder zone fully open (always calling for heat). This keeps the secondary pumps running, maintains good flow throughout the system, and lets you run the heat pump at its most efficient temperature while still delivering excellent comfort.
See also: Heat Curves Explained
Your Adlår Castra heat pump offers standard weather-compensation curves (HH1–HH8 and HL1–HL8) as well as the ability to create fully custom heat curves for maximum precision and efficiency.
What are custom heat curves?
Standard curves give you 8 pre-set options. Custom curves let you define your own relationship between outside air temperature and the water temperature delivered to your radiators or underfloor heating. This is ideal if:
- Your home has unusual insulation levels or heat loss
- You have a mix of emitters (UFH + radiators)
- You want the absolute best comfort and lowest running costs
When to use them
Most homes do very well with the standard HL or HH curves (your installer will have chosen a good starting point). Only move to a custom curve once you have lived with the standard settings for a few weeks and want to fine-tune further.
Full guide & diagrams Download the complete Adlår Castra Custom Heat Curves PDF here: https://adlar.co.uk/wp-content/uploads/Adlar-Castra-Custom-Heat-Curves-1.pdf
Tip Always allow at least 24 hours after any curve change for your home to stabilise before making further adjustments.
See also: Heat Curves Explained Which Heat Curve Should I Set? How to Adjust Temperature Settings
Many people coming from traditional gas boilers are used to turning radiators or whole zones off to “save energy”. With an Adlår Castra heat pump, heavily zoning your system is one of the worst things you can do.
Why heavy zoning causes problems
- Closing too many zones or valves dramatically reduces water flow → this is the #1 cause of E37 and E51 errors.
- The heat pump is forced to run hotter and short-cycle (turn on and off frequently) instead of running steadily at low temperature.
- Efficiency drops and your electricity bills can actually go up.
- Heating becomes uneven and less comfortable across the house.
The shocking truth Running with most zones open is far more efficient and comfortable than constantly opening and closing them. Heat pumps are designed for constant, low-temperature flow — not the on/off behaviour that worked with old boilers.
Best practice instead
- Set all room thermostats high (or 2–3 °C above current room temperature) so most zones stay open.
- Optimise your heat curve until you achieve the right comfort level (see our Heat Curves guide).
- Always keep at least one main or larger zone fully open at all times — this maintains good flow and lets the heat pump run at its most efficient setting.
Once you do this, many customers are surprised how much quieter, more even, and cheaper the system becomes.
See also: Secondary Pumps & Zone Control
With a traditional gas boiler it made sense to turn off radiators in unused rooms to save energy.
With your Adlår Castra heat pump it is the opposite — turning off radiators is one of the worst things you can do.
Why you should leave them on
- Closing radiators (or TRVs) reduces water flow through the system → this is the #1 cause of E37 and E51 errors.
- The heat pump is forced to run hotter and short-cycle (constantly switching on and off), which is inefficient.
- Your electricity bills actually go up and the house heats unevenly.
The right way to run your system
- Set all TRVs and room thermostats high (at least 2–3°C above current room temperature) so most radiators stay open.
- Optimise your heat curve to the lowest setting that still gives you comfortable warmth.
- Keep at least one main zone or larger room fully open at all times — this maintains good flow and lets the heat pump run efficiently and quietly.
Once you stop turning radiators off, most customers notice the system becomes quieter, more even, and noticeably cheaper to run.
Bottom line: Heat pumps love constant, gentle flow — not the on/off behaviour that worked with old boilers.
See also: Why You Should NOT Heavily Zone Your Heating E51 and E37 Errors Secondary Pumps & Zone Control Heat Curves Explained
For traditional gas boilers → No. Turning the heating off when you’re out and only turning it on when needed is usually more efficient.
For your Adlår Castra heat pump → Yes – leave it on constantly!
Heat pumps work completely differently to boilers. They are most efficient when they run steadily at low temperature rather than constantly cycling on and off.
Why constant running is better with a heat pump
- The house acts as a thermal battery — it stays warm with far less energy.
- The heat pump can use the lowest possible flow temperatures and best weather-compensation curves.
- No big “catch-up” periods when you come home — the system stays quiet, even, and cheap to run.
- Short-cycling (frequent on/off) actually increases your electricity use and can trigger flow errors (E37/E51).
Best practice for your Adlår system
- Keep the heat pump on all year round (even in summer – see our Summer guide).
- Set a low heat curve (usually HL series) and let it run 24/7.
- Avoid turning zones or radiators off — keep most of them open for steady flow.
Most customers are surprised how much quieter, more comfortable, and cheaper the system becomes once they stop turning the heating off.
See also:
Your Adlår Castra system is already highly efficient. These 11 practical tips are tailored specifically for Adlår owners and can help you lower your electricity bills even further:
- Leave the heat pump on 24/7 Heat pumps are most efficient when they run constantly at low temperature. Turning the system off creates expensive catch-up periods and short-cycling.
- Stop turning radiators and zones off Keep most (or all) radiators and zones open. Closing them reduces flow, triggers E37/E51 errors, and makes the heat pump run less efficiently.
- Use the lowest comfortable heat curve This is the single biggest efficiency lever. Most homes do best on HL8–HL4. Lower it gradually until you find the perfect balance of comfort and cost.
- Lower your hot water temperature Set your Fjord I cylinder to 48–50°C instead of 55–60°C. You’ll still have plenty of hot water but use significantly less energy.
- Use Smart Scenes for smart control Automate heat curve changes based on time of day, room temperature, or occupancy — no need to manually open/close zones.
- Always keep at least one main zone open Ensure one large or colder zone is always calling for heat. This maintains excellent flow and lets the heat pump run at its most efficient low-temperature setting.
- Switch to HL8 for free passive summer cooling On warm days set the lowest heat curve (HL8) and optionally redirect cold air from the Fjord cylinder indoors.
- Use Smart Scenes to gently lower the heat curve overnight Instead of dropping room thermostats (which can close zones), create a simple Smart Scene that automatically lowers your heat curve by 1–2 steps at night or when the house is empty.
- Stop insulating internal heating pipes Any heat lost from pipes inside the heated part of your home still warms the rooms. Insulating these pipes makes almost no difference to your bills. Only insulate pipes that run through unheated spaces (loft, garage, etc.) or the external underground run (which is already pre-insulated).
- Clean your magnetic filter regularly A clean filter maintains optimum flow rates and protects the heat pump, circulation pump, and valves.
- Have your system serviced annually Professional servicing keeps everything running at peak efficiency and prevents small issues from becoming expensive ones.
Adlår-specific advantage Our inline design (no buffer or low loss header) already avoids the 4°C temperature loss that many other heat pump systems suffer from — so these small changes deliver even bigger savings.
Most customers see the biggest reductions from tips 1, 2, 3 and 5.
Recommended setting for your Fjord I cylinder: 48–50°C
This is the sweet spot for maximum efficiency with your Adlår Castra heat pump.
Why 48–50°C is best
- Lower storage temperature = significantly lower electricity use
- Your heat pump can produce hot water far more efficiently at these temperatures
- You still get plenty of usable hot water for showers, baths and taps
Legionella Protection – How Adlår Handles It
Your Fjord I cylinder has built-in automatic Legionella protection:
- Once a week the system automatically runs a Legionella cycle, heating the water to over 60°C for a short period to kill any bacteria.
- The electric anode also helps prevent bacterial growth and scale.
- You do not need to keep the cylinder at 60°C all the time.
How to change the temperature
- On the Fjord I cylinder display, press the Power button to wake it.
- Use the arrow buttons to set the target temperature to 48–50°C.
- The Legionella cycle will still run automatically each week.
Tip: If you ever notice the water feels too cool, you can temporarily use the immersion boost (squiggly “N” button) for a one-off top-up to 55–60°C.
Bottom line Keeping your hot water at 48–50°C is safe, highly efficient, and exactly what the Adlår system is designed for. The automatic Legionella cycle takes care of the safety side for you.
See also: How to Set Hot Water Timer on Your Fjord I Cylinder
11 Easy Ways To Reduce Your Energy Bills with Your Adlår Castra Heat Pump
Adlår offers all-inclusive warranty packages designed to give you complete peace of mind with your Castra heat pump and Fjord I cylinder for many years.
Standard Warranty (Included Free with Every System)
- 2 years parts cover for manufacturer defects
- Covers the outdoor unit and indoor components supplied by Adlår
- Does not include annual servicing, maintenance, optimisation, or call-outs
Gold Warranty (Recommended)
- Up to 5 years full parts and labour
- Annual servicing and maintenance included
- System efficiency checks and optimisation
- Priority engineer response
- Full access to the Adlår Castra customer app and support
Platinum Warranty
- Up to 15 years full parts and labour
- Everything included in the Gold package
- Remote system monitoring by Adlår engineers
- Advanced smart controls and ongoing performance optimisation
- The most comprehensive long-term protection available
Warmth Guarantee (Included with All Plans)
If your heating or hot water system does not perform as designed (e.g. the house doesn’t reach the agreed comfort levels), Adlår will return and resolve the issue at no extra cost — this goes beyond a normal parts-only warranty.
Why choose an All-Inclusive plan?
- Predictable running costs with included servicing
- Expert support from the same team that designed and installed your system
- No hidden costs for call-outs or repairs
- Long-term protection (up to 15 years)
All warranties are backed by Adlår’s in-house team — no third-party handovers.
Choosing the right heat curve is one of the most important settings on your Adlår Castra heat pump. It determines the water temperature delivered to your radiators or underfloor heating based on the outside (ambient) temperature.
Unlike traditional boilers that run hot and short (60–80°C for 6–8 hours), heat pumps work best with gentle, continuous circulation at much lower temperatures (typically 24–55°C). This delivers more even, comfortable heat and significantly better efficiency.
Below are the two detailed graphs showing all available curves:
High Temperature Curves (HH1 – HH8)
Low Temperature Curves (HL1 – HL8)
How the Curves Drop (Step Rate Explanation)
Each curve has a different rate of drop — this is how quickly the water temperature reduces as the outside (ambient) temperature rises. This is the key difference between the curves.
High Curves (HH1 – HH8)
| Curve | Starting Water Temp (at very cold ambient) | Drop Rate | Best For |
|---|---|---|---|
| HH1 | ~55–58°C | Very slow drop (~1°C every 12°C ambient rise) | Poorly insulated homes, high comfort demand, old radiators |
| HH2 | ~54–56°C | Faster drop after -19°C (~1°C every 4°C ambient) | Average insulation |
| HH3 | ~53–55°C | Steep drop (~2°C every 3°C ambient) | Better insulated homes, users who prefer cooler when it's mild |
| HH4 | ~53°C | Slow gradual drop (similar pattern to HH1 but lower start) | Good insulation + moderate comfort |
| HH5 | ~53°C | Faster drop (similar to HH2 but lower start) | Slightly better insulated homes |
| HH6 | ~45°C | Slow drop (like HH1 pattern) | Milder climates or shoulder seasons |
| HH7 | ~45°C | Faster drop (like HH2 pattern) | Good insulation |
| HH8 | ~43°C | Slow drop | Transitional seasons, well-insulated homes |
Low Curves (HL1 – HL8) – Most Common for Modern Homes
| Curve | Starting Water Temp | Drop Rate | Best For |
|---|---|---|---|
| HL1 | ~39°C | Slow drop | Well-insulated homes wanting warmer output |
| HL2 | ~35–36°C | Moderate drop | Good all-rounder for UFH |
| HL3 | ~35°C | Steeper drop every 6°C ambient | Better insulated properties |
| HL4 | ~33°C | Slow drop every 12°C ambient | Most common starting point for modern homes |
| HL5 | ~33°C | Faster drop every 6°C ambient | Good insulation + efficiency focus |
| HL6 | ~33°C | Moderate drop every 8°C ambient | Balanced efficiency |
| HL7 | ~29°C | Very slow drop every 12°C ambient | Excellent insulation, low energy use |
| HL8 (DYN) | ~22–23°C | Almost flat / very gentle dynamic curve | Summer, passive cooling, very well insulated homes |
Detailed Curve Characteristics
High Curves (HH1–HH8) – Higher water temperatures
- HH1 is the warmest (starts ~55°C at very low outside temperatures)
- HH8 starts lower (~43°C) and is better for milder conditions or better-insulated homes
Low Curves (HL1–HL8) – Lower water temperatures (most popular)
- HL1 starts around 39°C
- HL8 is the lowest and gentlest curve — ideal for well-insulated homes and summer passive cooling
HL8 is often the best starting point for most properties to give an initial reasonable understanding of the performance, which can then be adjusted slowly to match comfort levels and personal preference.
Key Factors That Influence Your Ideal Curve
- Emitter type: Underfloor heating works brilliantly on low curves; older radiators often need higher ones.
- Insulation level: Better insulation = lower curve.
- Comfort preference: Like it very warm? Go higher. Happy with “just comfortable”? Go lower.
- Heat pump location: Sunny/sheltered spot may allow a lower curve.
- Time of year: Most of the year you’ll use the lowest comfortable curve (especially HL8).
Pro Tip The heat pump responds slowly. After changing the curve, wait at least 24 hours (ideally 48 hours) before deciding whether to adjust it further.
Advanced Optimisation
- Use Smart Scenes with a Smart Life room thermostat (air sensor) in your warmest room to automatically adjust the heat curve based on actual indoor temperature.
- For ultimate control, create custom heat curves (see our Custom Heat Curves guide)
What is the Legionella Cycle?
Your Fjord I cylinder automatically runs a Legionella disinfection cycle (also called high-temperature disinfection) to kill bacteria in the hot water tank.
- Frequency: Every 7 days (adjustable via Parameter 16)
- Default time: 23 (11:00 pm) – adjustable via Parameter 13
- Default temperature: 60°C (adjustable via Parameter 4)
- The cycle uses the immersion heater (electrical heating element) inside the cylinder.
What You Will See During the Cycle
- The electrical heating icon (square with a wave symbol) will flash on the cylinder display.
- If you have a smart meter, you will see a noticeable spike in electricity usage while the immersion heater is running.
- The tank will heat up to the set disinfection temperature (default 60°C) and hold it for the set time (default 30 minutes).
How to Optimise Energy Usage (Recommended)
Running the immersion heater is less efficient than using the heat pump. Here’s how to reduce the cost:
- Move the cycle to a cheaper tariff period Change Parameter 13 to start the cycle during an off-peak period (e.g. 02:00 or 03:00 on Octopus Go / Cosy tariffs).
- Pre-heat the tank using the heat pump (Biggest saving) A few hours before the Legionella cycle is due to start, raise the normal tank temperature from your usual setting (e.g. 48–50°C) up to 60°C using the heat pump. This way, when the disinfection cycle begins, the immersion heater only needs to top up or maintain temperature instead of doing all the work from cold.
- Review on Youtube videos or FAQ guides on "Smart Scenes" to find out more on setting up a smart scene to bring your temperature up on a weekly basis.
This simple change can significantly reduce the amount of expensive immersion heating used.
How to Change Parameters on the Fjord I
Follow these steps carefully:
- Press the Power button to wake up the screen (both temperatures should be visible).
- Press and hold the Settings (gear) button for 5–6 seconds.
- If you see the letter “A” appear, you didn’t hold it long enough. Press Power to go back and try again.
- 01 should now appear on the screen.
- Use the arrow buttons to scroll to the parameter you want to change (e.g. 13 for Legionella start time).
- Press the Settings button once (tap) — the number on the bottom right will start flashing.
- Use the arrow buttons to change the value.
- Press the Settings button again to confirm.
- Press the Power button (or wait) to return to the normal display.
Useful Parameters for Legionella
| Parameter | Description | Default | Recommended Action |
|---|---|---|---|
| 4 | Week disinfection temperature | 70°C | Set to 60°C |
| 5 | High temp disinfection time | 30 min | Usually fine |
| 13 | Disinfection start up time | 23 | Change to off-peak tariff time |
| 16 | High temp disinfection frequency | 7 days | Usually fine |
51 & E37 Errors – Low System Pressure
These two errors are very common and are most often caused by low water pressure in the heating system.
How to Check Your System Pressure
Look for the pressure gauge on your heating system. It is usually located on or right next to the red expansion vessel (a red tank roughly the size of a football).
Correct pressure:
- Should read between 1.0 – 2.0 bar
- Ideal / default setting = 1.7 bar
If the needle is below 1.0 bar, your system is low on pressure and this is likely causing the E37 or E51 error.
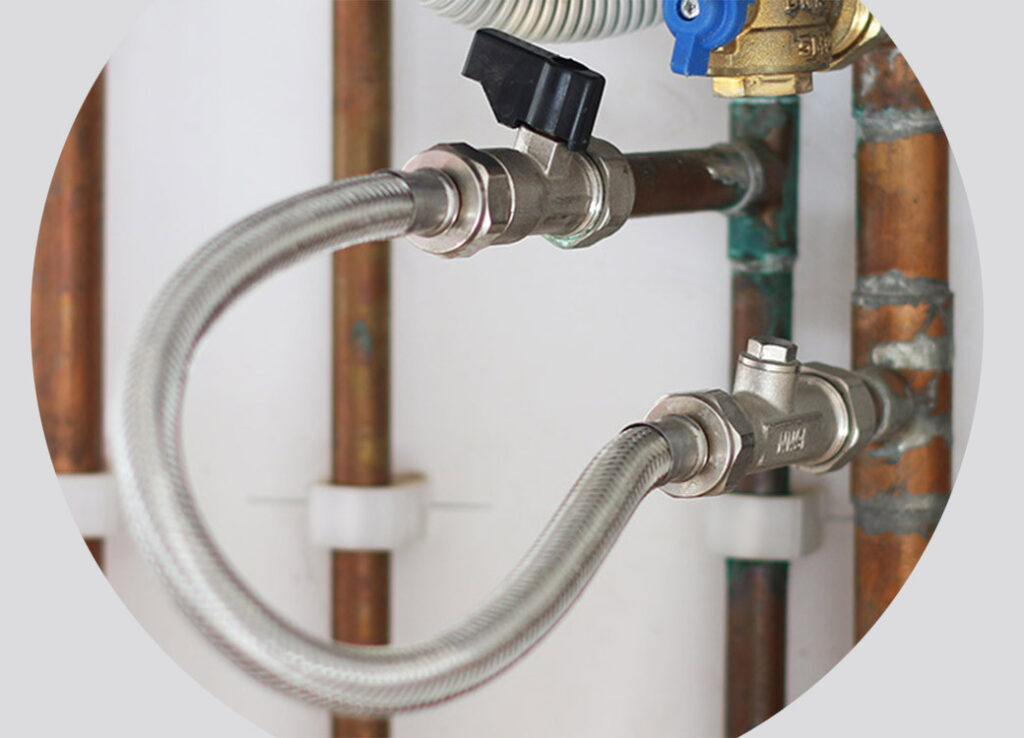
How to Top Up Your Heating System (Using the Filling Loop)
- Locate the silver flexible hose (the filling loop) near the pressure gauge.
- On each end of this hose you will find small black valves (or levers).
- Slowly open one valve, then the other.
- Watch the pressure gauge carefully as the pressure rises.
- Close both valves as soon as the pressure reaches 1.6 – 1.7 bar.
- Do not over-pressurise the system (above 2.0 bar is too high).
Tip: It is better to add pressure in small stages rather than flooding the system.
Recommended Images to Add
Here are good example images you can use:
Pressure Gauge + Red Expansion Vessel

Filling Loop (Flexible Hose with Valves)

Clear Diagram of a Filling Loop
Important Notes
- Only top up the system when it is cold (ideally below 30°C).
- If the pressure keeps dropping regularly, there may be a leak in the system — contact us so we can investigate.
- After topping up, monitor the pressure over the next few days.
The Fjord I cylinder has two temperature sensors — one near the top of the tank and one near the bottom.
Important: What the Display Shows
The temperature shown on the main display is the bottom tank temperature only.
This means:
- The top of your tank is often warmer than the temperature you see on the screen.
- This is completely normal and by design.
- Most people are used to seeing one temperature reading, so this can feel like a new experience at first.
How to View Both Tank Temperatures
You can easily check both sensor readings:
- Tap the Power button to wake up the screen.
- Tap the Settings (gear) button once.
- You will see the letter “A” appear on the display. → A = Bottom of the tank (this matches the main display temperature).
- Press the Down arrow once. → You will now see the letter “B”. → B = Top of the tank temperature.
What to Expect
| Situation | Bottom Sensor (A) | Top Sensor (B) | Notes |
|---|---|---|---|
| Normal operation | Shows on display | Usually higher | Top is warmer – normal |
| During Legionella cycle | Jumps toward 60°C | Significantly higher | Top can be well above 60°C |
| After hot water use | May drop first | Drops more slowly | Top stays warmer longer |
Summary
- The screen only shows the bottom temperature.
- The top of the tank is nearly always warmer.
- Use the A and B readings when you want to know the full picture of your hot water temperature.
Air source heat pumps are very efficient, but they heat water more slowly than a traditional boiler or immersion heater. If you have high hot water demand, you may need to make a few adjustments to get the best performance and comfort.
1. Optimise Your Hot Water Usage
If your household uses a lot of hot water, consider these strategies:
- Use aerated / air-filter shower heads (reduces water flow while maintaining pressure)
- Install an electric shower in a backup bathroom for high-demand periods
- Spread out shower and hot water usage throughout the day instead of everyone showering at once
- Use the immersion heater on the Fjord I cylinder during periods of very high demand (this is less efficient but can help when needed)
2. Common Cause: Timers or Smart Scenes Restricting the Cylinder
One of the most frequent reasons the Fjord I doesn’t heat properly is that a timer or Smart Scene is limiting when the cylinder is allowed to run.
A. Check the Cylinder Display for Active Timers
If you see two clock symbols on the display, a timer is active.
To delete the timer:
- Long press the clock button.
- “ON” will appear with a flashing time.
- Tap the Settings button once.
- The clock symbols should disappear and the timer will be cancelled.
B. Check Timers in the Smart Life App
- Open the Smart Life app and go to your Fjord cylinder.
- On the main temperature screen, tap the clock icon in the bottom right.
- Check if any timers are active.
- Delete or turn off any timers that are restricting the cylinder.
C. Check Smart Scenes / Automations
Smart Scenes can also turn the cylinder on/off automatically.
To check and disable them:
- On the main homepage of the app, tap “Smart” at the bottom.
- At the top of the screen, make sure “Automation” is selected (not “Tap-to-Run”).
- Look through the list for any scenes related to the Fjord cylinder.
- Turn off or delete any scenes that are limiting when the cylinder can run.
Quick Summary – What to Check First
| Check | Where to Look | What to Do |
|---|---|---|
| Timer on display | Cylinder screen | Long press clock button → delete |
| Timer in App | Fjord cylinder → clock icon | Delete or disable timers |
| Smart Scenes | Smart → Automation | Turn off any scenes controlling the cylinder |
Heating with a heat pump is very different from heating with a traditional gas or oil boiler. Understanding these differences is the key to getting the best performance, comfort, and efficiency from your Adlår Castra system.
1. Slow and Low
Heat pumps work best when they deliver gentle, low-temperature heat over a long period of time, rather than blasting high-temperature water for short periods.
- Boilers typically heat water to 60–80°C and run for a few hours a day.
- Heat pumps usually run at 35–50°C (sometimes lower) and are designed to run for much longer periods.
This “slow and low” approach feels more comfortable and even throughout the house.
2. Always On (Even in Summer)
Unlike a boiler, your heat pump should stay switched on all year round.
- In winter it will run regularly to maintain your home’s temperature.
- In summer, when the outside temperature is higher than your desired water temperature, the heat pump will simply not run (or run very little). This is completely normal and uses almost no electricity.
Leaving the system on allows it to respond automatically when the weather changes.
3. Heat Curves (Weather Compensation)
Your heat pump doesn’t just heat water to one fixed temperature. It uses a heat curve (also called weather compensation) to automatically adjust the water temperature based on the outside temperature.
- When it’s very cold outside → the heat pump produces warmer water.
- When it’s mild outside → the heat pump produces cooler water.
This is much more efficient than running at a constant high temperature all the time. Your installer will have set an initial curve, but you can fine-tune it based on how warm you like your home.
4. Efficiency Comes from Consistency
Heat pumps are most efficient when they can maintain a steady, low temperature rather than constantly switching on and off.
- Frequent on/off cycling uses more energy and puts more wear on the system.
- Running steadily at a lower temperature uses less electricity and keeps your home at a more consistent, comfortable temperature.
This is why we recommend keeping the heat pump on 24/7 and avoiding turning it off when you go out or at night (unless you’re using smart setback scenes).
Summary – The Heat Pump Mindset
| Traditional Boiler | Heat Pump (Best Practice) |
|---|---|
| High temperatures | Low temperatures |
| Short running periods | Long, continuous running |
| On/Off control | Steady, consistent temperature |
| Turn off when not needed | Leave on all year round |
Once you get used to the “slow and low, always on” approach, most people find heat pumps more comfortable and cheaper to run.
If your Fjord I cylinder was originally installed with the cold air ducted straight outside, you can retrofit a damper system afterwards. This allows you to easily switch between exhausting the cold air outside or ducting it into your home for passive cooling during warmer months.
Why Retrofit a Damper?
- Gives you manual control to use the free cooling from the cylinder when needed.
- Avoids repeatedly disconnecting and reconnecting ducting.
- Makes seasonal changes quick and simple.
Recommended Setup Options
Here are the best components for retrofitting:
| Option | Product | Size | Best For | Notes |
|---|---|---|---|---|
| Option 1 (Recommended) | Ubbink Aerfoam Insulated Mass Flow Ducting T Piece | 160mm | Clean, well-insulated install | Good insulation, modern look |
| Option 2 | Ubbink 160mm Insulated Duct Y-Piece | 180mm | Slightly larger airflow | Good alternative if you need more airflow |
| Damper | Plastic Supply PVCBD08 Butterfly Damper (PVC) | 8 inch (approx. 200mm) | Manual airflow control | Available from Raptor Supplies UK |
You can combine either the 160mm T-piece or 180mm Y-piece with 2x 8-PVC butterfly dampers to control whether the cold air goes outside or inside.
How to Fit the Damper Setup
- Isolate the Fjord I cylinder and allow it to cool if necessary.
- Remove the existing ducting from the top outlet of the cylinder.
- Fit your chosen T-piece or Y-piece onto the cylinder’s air outlet spigot and secure it properly.
- Install the two butterfly dampers in the legs of the duct Y or T piece.
- Connect one leg to outside (normal exhaust) and the other leg inside the house (cooling mode).
- Insulate all indoor duct runs thoroughly to prevent condensation.
Tips for Best Results
- Use insulated ducting on any indoor runs to reduce condensation risk.
- Position the indoor duct termination where cool air can circulate well (e.g. hallway or landing).
- Only use the indoor cooling mode when you actually need it — running it unnecessarily can overcool parts of the house.
Product Links:
- Rubber Fernco for top of cylinder connection
- Y/T Piece Connectors
- Dampers
The E09 error on your Adlår Castra system is caused by a communication/signal problem between the indoor display and the heat pump.
What Causes the E09 Error?
This error usually occurs when the display loses its connection to the main controller in the heat pump. Common reasons include:
- The communication cable has become disconnected
- Damage to the cable (e.g. during other works, drilling, or cable routing)
- Loose connection at the display or at the heat pump end
Simple Troubleshooting Steps
Try these steps in order:
- Check the display connection Carefully unplug the display from its cable and plug it back in firmly. This often clears the error if the connection was loose. Try turning the system off at the isolator, waiting 2 minutes, and reactivating the system again to check if the error has cleared.
- Inspect the cable route If any work has recently been carried out near the display or along the cable run (e.g. drilling, new sockets, or other installations), check for any visible damage to the communication cable.
- Power cycle the system Turn the heat pump off at the isolator for 30 seconds, then turn it back on. This can sometimes reset the communication.
If the Error Persists
If unplugging and replugging the display does not clear the E09 error, it is likely that the communication cable has been damaged or there is a fault with the display itself.
In this case:
- A new communication cable will usually need to be run, or
- The display may need to be replaced