
E37 Error
The E37 error means your heat pump has detected poor water flow.
Main Causes
- Low water pressure Your heating system needs to be filled to 1.7 bar. → See this guide: How to top up your heating system using a filling loop.
- System has a leak
- Ensure that there are no leaks on the system.
- Zones or radiators shutting down
- Thermostats or zone valves closing off underfloor heating (UFH) or radiator circuits.
- Very common if all UFH zones are closed.
Quick fix to test: Remove one zone actuator from your main zone so that circuit stays open. This often clears the error immediately.
Your Fjord I cylinder has two operating modes:
- Heating mode
- Heating + Fan mode
Heating + Fan mode keeps the fan running constantly for extra air circulation. The fan symbol will appear on the display if this is activated.
To change which mode you are in, either change it in the APP or by pressing and holding the immersion button (second button from the left) for 5~6 seconds. If this function is enabled the fan will continue working to ventilate the air, when the water temperature reaches the set point and unit is standby.
Important: This mode is only practical if your external exhaust is ducted internally in the property. Otherwise, use normal Heating mode.
Get your heat pump connected for app control in under a minute.
Quick steps:
- Press and hold the power button for 3 seconds to unlock the display.
- Press and hold the power button + up button together for 5 seconds.
- The Wi-Fi symbol will flash when it’s ready to connect.
- Move onto your phone now and follow our guide on connecting to your phone. (246) How to Connect Your Phone to the Adlar Castra Heat Pump - YouTube
Watch the full video: https://www.youtube.com/watch?v=lBGf72MT5ek
You can control your heat pump from your phone using the Smart Life app.
Step-by-step:
1. Activate WiFi on the heat pump
- Press any button to wake the screen.
- Press and hold the Power button + Up arrow together for 5 seconds.
- You’ll hear a beep and the WiFi symbol will start flashing.
2. Add the device in the Smart Life app
- Open the Smart Life app and sign in.
- Tap the + button to add a device.
- Go to Large Home Appliances → select Heat Pump (WiFi).
- Enter your home WiFi password.
- Wait for the app to connect.
Once connected, you can adjust temperature, change modes, and monitor your system remotely.
Watch the full video on our YouTube channel. (246) How to Connect Your Phone to the Adlar Castra Heat Pump - YouTube
See our guide on getting the heat pump into pairing mode: How to Activate WiFi on Your Adlar Castra UK Heat Pump
You can easily change the heating temperature directly on the heat pump control panel.
How to Adjust Temperature Settings on Your Adlår Castra Heat Pump
Step-by-step:
1. Unlock the display Press and hold the Power button for 3 seconds until you hear a beep (the padlock disappears).
2. Adjust in manual mode Use the Up and Down arrow buttons to set your desired temperature.
3. Use Heat Curve mode (recommended for efficiency)
- Let the screen flash after unlocking.
- Press and hold the M button.
- Choose your curve: HH1 (warmest) to HL8 (lowest).
- Press the Power button to save.
Tip: Heat Curve mode is usually more efficient than a fixed manual temperature.
You can easily change the heating temperature directly on the heat pump control panel.
How to Control Your Adlar Castra Heat Pump from Your Phone
Step-by-step:
1. Unlock the display Press and hold the Power button for 3 seconds until you hear a beep (the padlock disappears).
2. Adjust in manual mode Use the Up and Down arrow buttons to set your desired temperature.
3. Use Heat Curve mode (recommended for efficiency)
- Let the screen flash after unlocking.
- Press and hold the M button.
- Choose your curve: HH1 (warmest) to HL8 (lowest).
- Press the Power button to save.
Tip: Heat Curve mode is usually more efficient than a fixed manual temperature.
If your underfloor heating (UFH) zones stay cold, follow these checks in order:
Quick checks
- Room thermostats Set the thermostat 2–3°C higher than the current room temperature so the zone calls for heat.
- Zone actuators Check the actuators on the manifold are opening (you should hear them click). Remove one actuator to manually open the zone for testing.
- Flow meters Make sure all flow meters on the UFH manifold are fully open. → See: How to adjust flow rates on your Underfloor Heating System
- Circulation pump Confirm the pump is running (listen for it or check Live Data on the heat pump).
- Mixer valve Check the UFH mixer valve is set correctly (set to maximum / 50°C).
Extra checks
- System pressure must be around 1.7 bar.
- Bleed any air from the system.
- Make sure the heat pump is running and producing warm water (check flow temperature in Live Data).
Tip: Low flow is a very common cause — see our E37 Error guide if you get that error.
If your home isn’t getting warm enough, follow these simple steps:
1. Check the Sun Symbol Make sure the ☀️ sun symbol is showing in the top left of the display (this means heating mode is active). Tap the M button until the sun appears.
2. Turn the Heat Pump ON
- Press and hold the Power/Lock button for 5 seconds to unlock the display.
- Press the Power button again for 2–3 seconds. The sun symbol should appear and heating will start.
3. Increase the Heat Curve
- Unlock the display.
- Briefly press the Down arrow to enter heat curve mode.
- Press Down to raise the curve (higher number = more heat output).
Important note It can take 24–36 hours for your home to fully warm up after changing the heat curve.
During normal operation your Adlår Castra heat pump display should look like this:
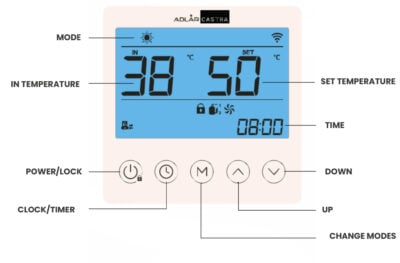
Main numbers
- IN – Return water temperature coming back from your home (example: 38°C)
- SET – Target water temperature (example: 50°C)
Symbols you should see
- ☀️ Sun symbol (top left) – Heating mode is active (this is what you want in winter)
- 📶 WiFi symbol – Connected to your home WiFi
- 🔒 Lock symbol – Display is locked (normal). Hold the Power button for 3–4 seconds to unlock.
- Pump symbol (bottom left) – Circulation pump is running
- Fan + Compressor symbols – The heat pump is working and heating your home
- TIME (bottom right) – Current clock time (example: 08:00)
Tip: If you see the sun, pump, fan and compressor symbols together, your system is operating normally.
How to Set Timers on Your Fjord I Cylinder
Your Fjord I cylinder has a built-in timer for automatic heating.
To set the Clock (current time):
- Short press the ⏰ Clock/Timer button.
- Use ▲ and ▼ arrows to set the hour and minute.
- Press ⏰ to save and exit.
To set the Timer (ON / OFF):
- Press and hold the ⏰ Clock/Timer button for 5 seconds.
- Set the Timer ON time:
- Use ▲ and ▼ to set the hour.
- Press ⏰ to move to minutes and set them.
- Press ⏰ again to set the Timer OFF time (repeat the steps).
- Press ⏰ once more to save and exit.
To cancel the timer while programming: While setting Timer ON or Timer OFF, press the Settings (gear) button to cancel.
Notes:
- The timer repeats every day.
- Settings are saved even after a power cut.
Alternative option: Create more flexible schedules using Smart Scenes in the Smart Life app.
How to Create Smart Scenes in the Adlår Castra App (Heating & Hot Water)
Smart Scenes let you automatically control your heat pump and Fjord I cylinder based on time, weather, or other triggers.
(246) How to Create Smart Scenes in the Adlår Castra App (Heating & Hot Water) - YouTube
Step-by-step:
- Open the Smart Life app and tap Scene (or Smart) at the bottom.
- Tap the + icon to create a new scene.
- Choose a trigger (e.g. specific time, sunrise/sunset, or temperature).
- Add an action:
- Select your Adlår Castra heat pump or Fjord I cylinder.
- Turn it On/Off, set temperature, choose Heating or Hot Water mode, or activate immersion boost.
- Name your scene (e.g. “Morning Heat” or “Evening Hot Water”) and tap Save.
Note: Scenes may struggle
Smart Thermostats
You can add smart room temperature sensors to the Smart Life app for automatic, efficient control of your Adlår heat pump.
How to use it:
- Pair the sensor in the Smart Life app.
- Create a Smart Scene that changes the heat curve based on the actual room temperature.
Example scene:
- If room temperature > 21°C → set a lower heat curve (e.g. HL1)
- If room temperature < 21°C → set a higher heat curve (e.g. your normal HH8)
Efficiency tip: Use the thermostat to adjust heat curves rather than turning the heat pump fully on or off. This reduces short cycling and improves efficiency